How to deploy static sites with Google Cloud Storage bucket and Cloud Functions backend
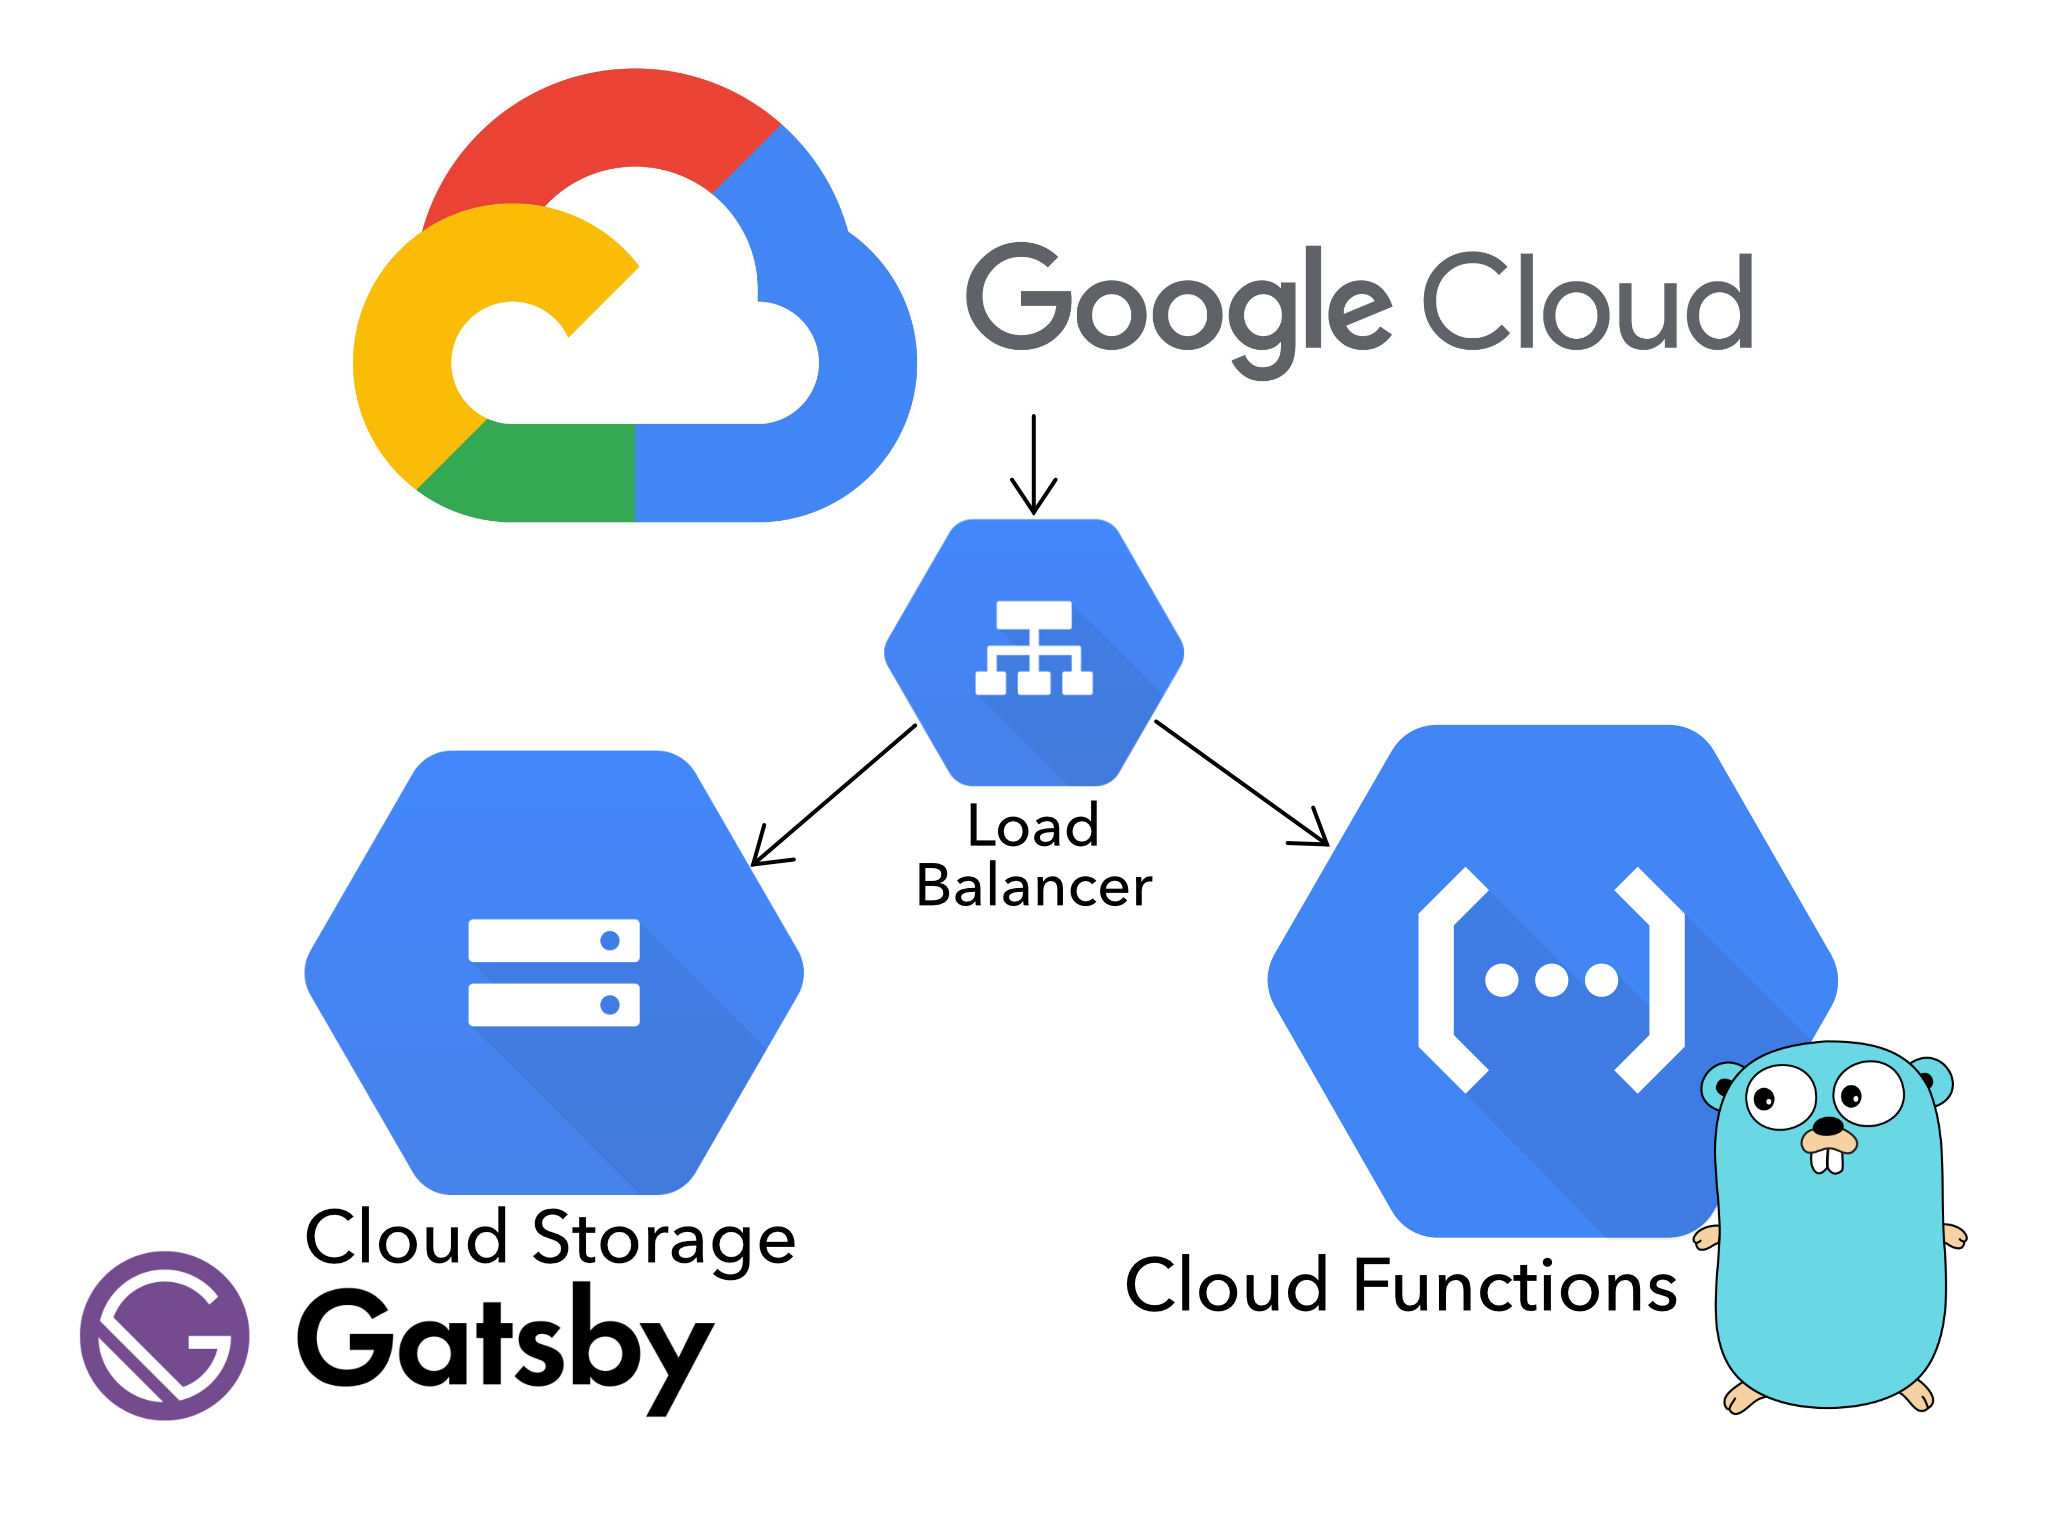
I developed a Secret Santa website that I initially hosted on Google Cloud Platform (GCP). Since speed was important, I chose the provider I am most familiar with. I used an HTTPS load balancer to serve static content from a Cloud Storage bucket and map Cloud Functions to specific URLs. After all was set up I was not very happy with the cost nor the complexity of it, so I turned my head towards Firebase. I found that Firebase hosting would allow me to configure everything from a single source. No need to create load-balancers, buckets, backends, certificates, etc. Everything is managed by an individual JSON document. This is the first in a series of blog posts about this journey. In this one, I explain how I set up GCP.
Project description
The project is a Secret Santa organizer tool. Users sign-up their group and share a link with their friends. Using the link, each member can set their preferences, hobbies, and tastes. Once everyone is ready, the tool draws the names. Members can then log in to see their drawn name with their hobbies and preferences.
The main constrain I had with this project was timeframe and cost of operation. I started the project in late November, and it had to be ready weeks before Christmas to be useful. For these reasons, I used familiar technologies: React for the frontend and Go for the backend. To keep the running cost low, I used a static frontend and Cloud Functions for the backend, so there is no permanent server to pay.
Instead of Cloud Functions, I briefly considered using Firestore directly from the frontend. I am planning to make another blog post going deep into this to see if that would have been a better option.
Finally, I self-imposed some other requirements. The website had to be accessible from a custom domain via HTTPS with managed certificates. I also had my heart set on serving the functions from the same domain. I thought it would be simpler than setting up CORS (in retrospective, it probably was not).
GCP Setup
To satisfy all my constraints I went the quickest route. I pulled a Gatsby template and used some Go boilerplate for Cloud Functions. I already knew that Cloud Storage does not support SSL for the buckets directly and that I had to set up an HTTPS load-balancer. Sure enough, I followed the GCP guide and I was ready in a few minutes. However, I still had to configure an HTTP to HTTPS redirect and a redirect to the www. subdomain from the top one. I also had to map the Cloud functions. The process was not complicated but I did have to read a fair bit of documentation. I condensed the necessary work to configure the load-balancer in the following steps:
- Configure a Cloud Storage bucket
Since we are going to use an HTTPS load-balancer there are no restrictions on the bucket name. I would not recommend naming it as your domain to skip the verification step. Additionally, to simplify further development work I recommend adding automatic deployment as a CI step. To have it running fast, I used the free version of Gatsby Cloud. - Set up Cloud Functions with an HTTP trigger
Use your supported language of choice to write the backend. Make sure you are using HTTP trigger and have selected the right level of permissions. For a public website, you probably wantallUsersto have invoker permissions. Be aware that this could allow a malicious party to massively increase your costs by executing your functions at will. - Create a network endpoint group for the Cloud Functions
This will be the backend target for our load-balancer. I used the keyword<function>to use the function name as part of the URL. To be REST-ish I had different function each handling theGET,POSTandPUTof single resources. In my case: the functionsgroupandmember.
Google Cloud console Network Endpoint Group details. Note the URL mask using the keyword. - Reserve an IP address
Since we will have to attach both anHTTPSandHTTPload-balancer to the same IP address to get the HTTPS redirect to work we cannot use ephemeral IP addresses. - Set up the HTTPS load-balancer
The wizard gives you all the tools that you need - take a look at my configuration.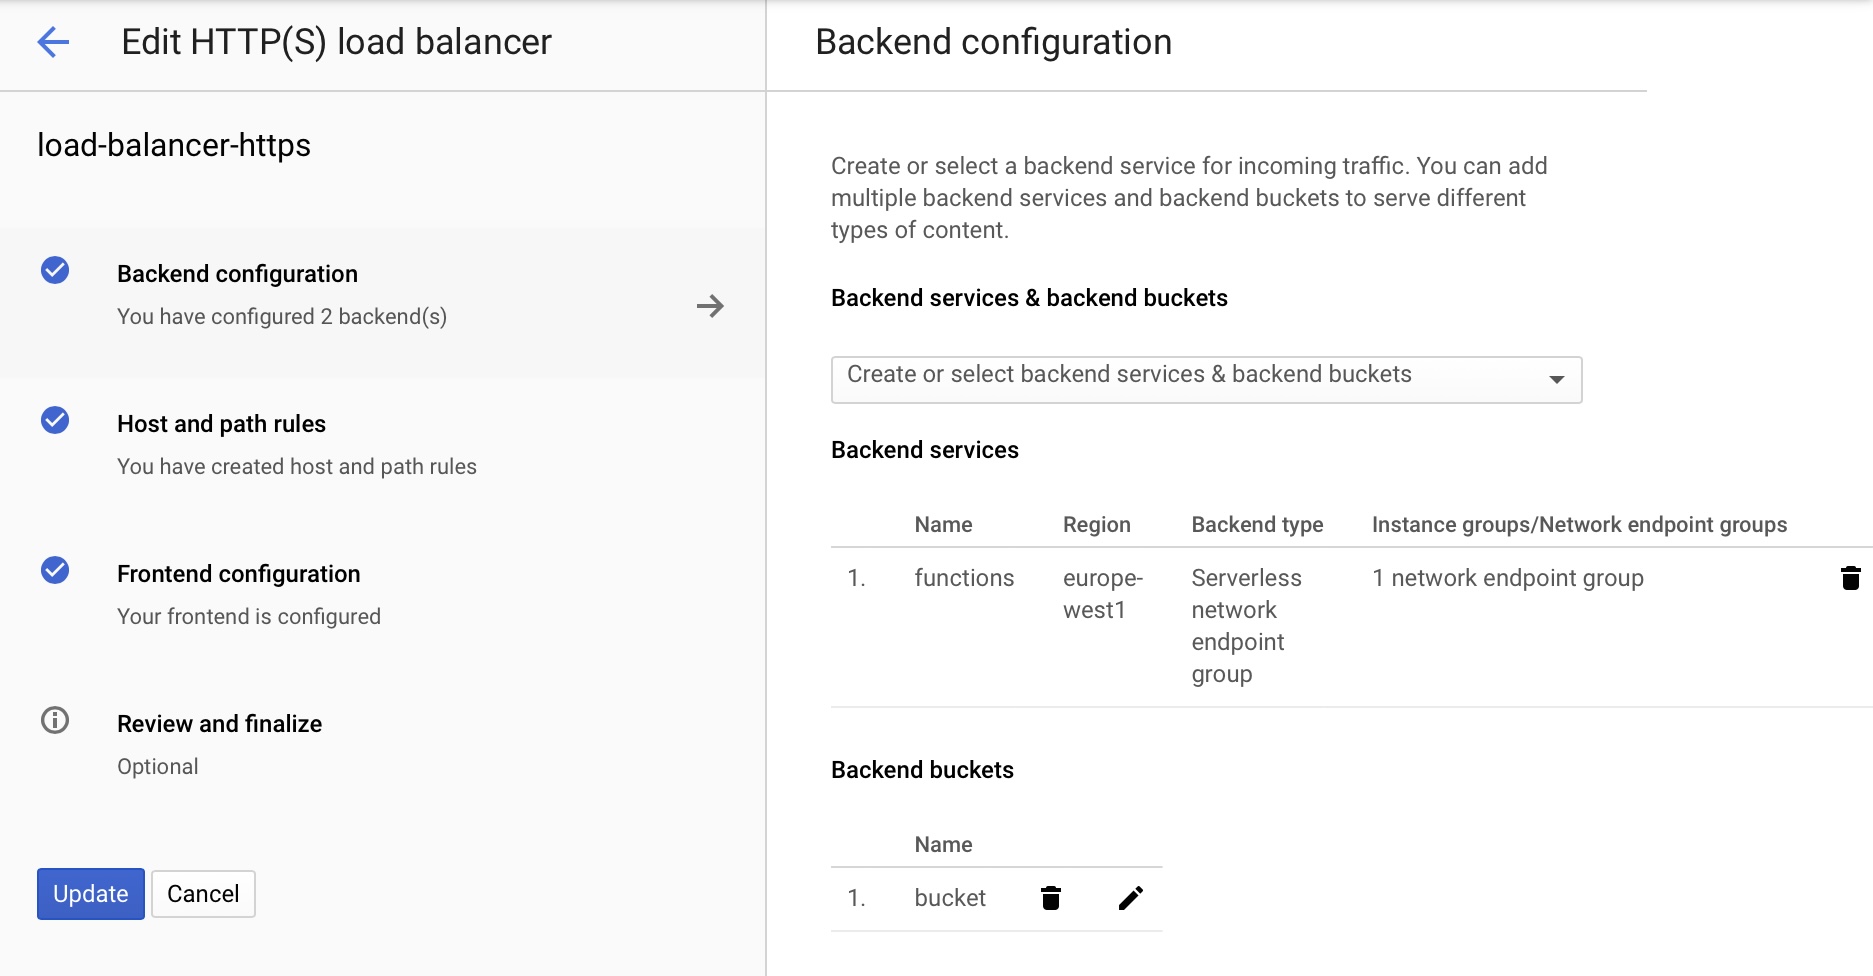
Google Cloud load-balancing creating wizard, backend section. There are two backends, one pointing to the bucket and the other to the NEG that groups the functions. 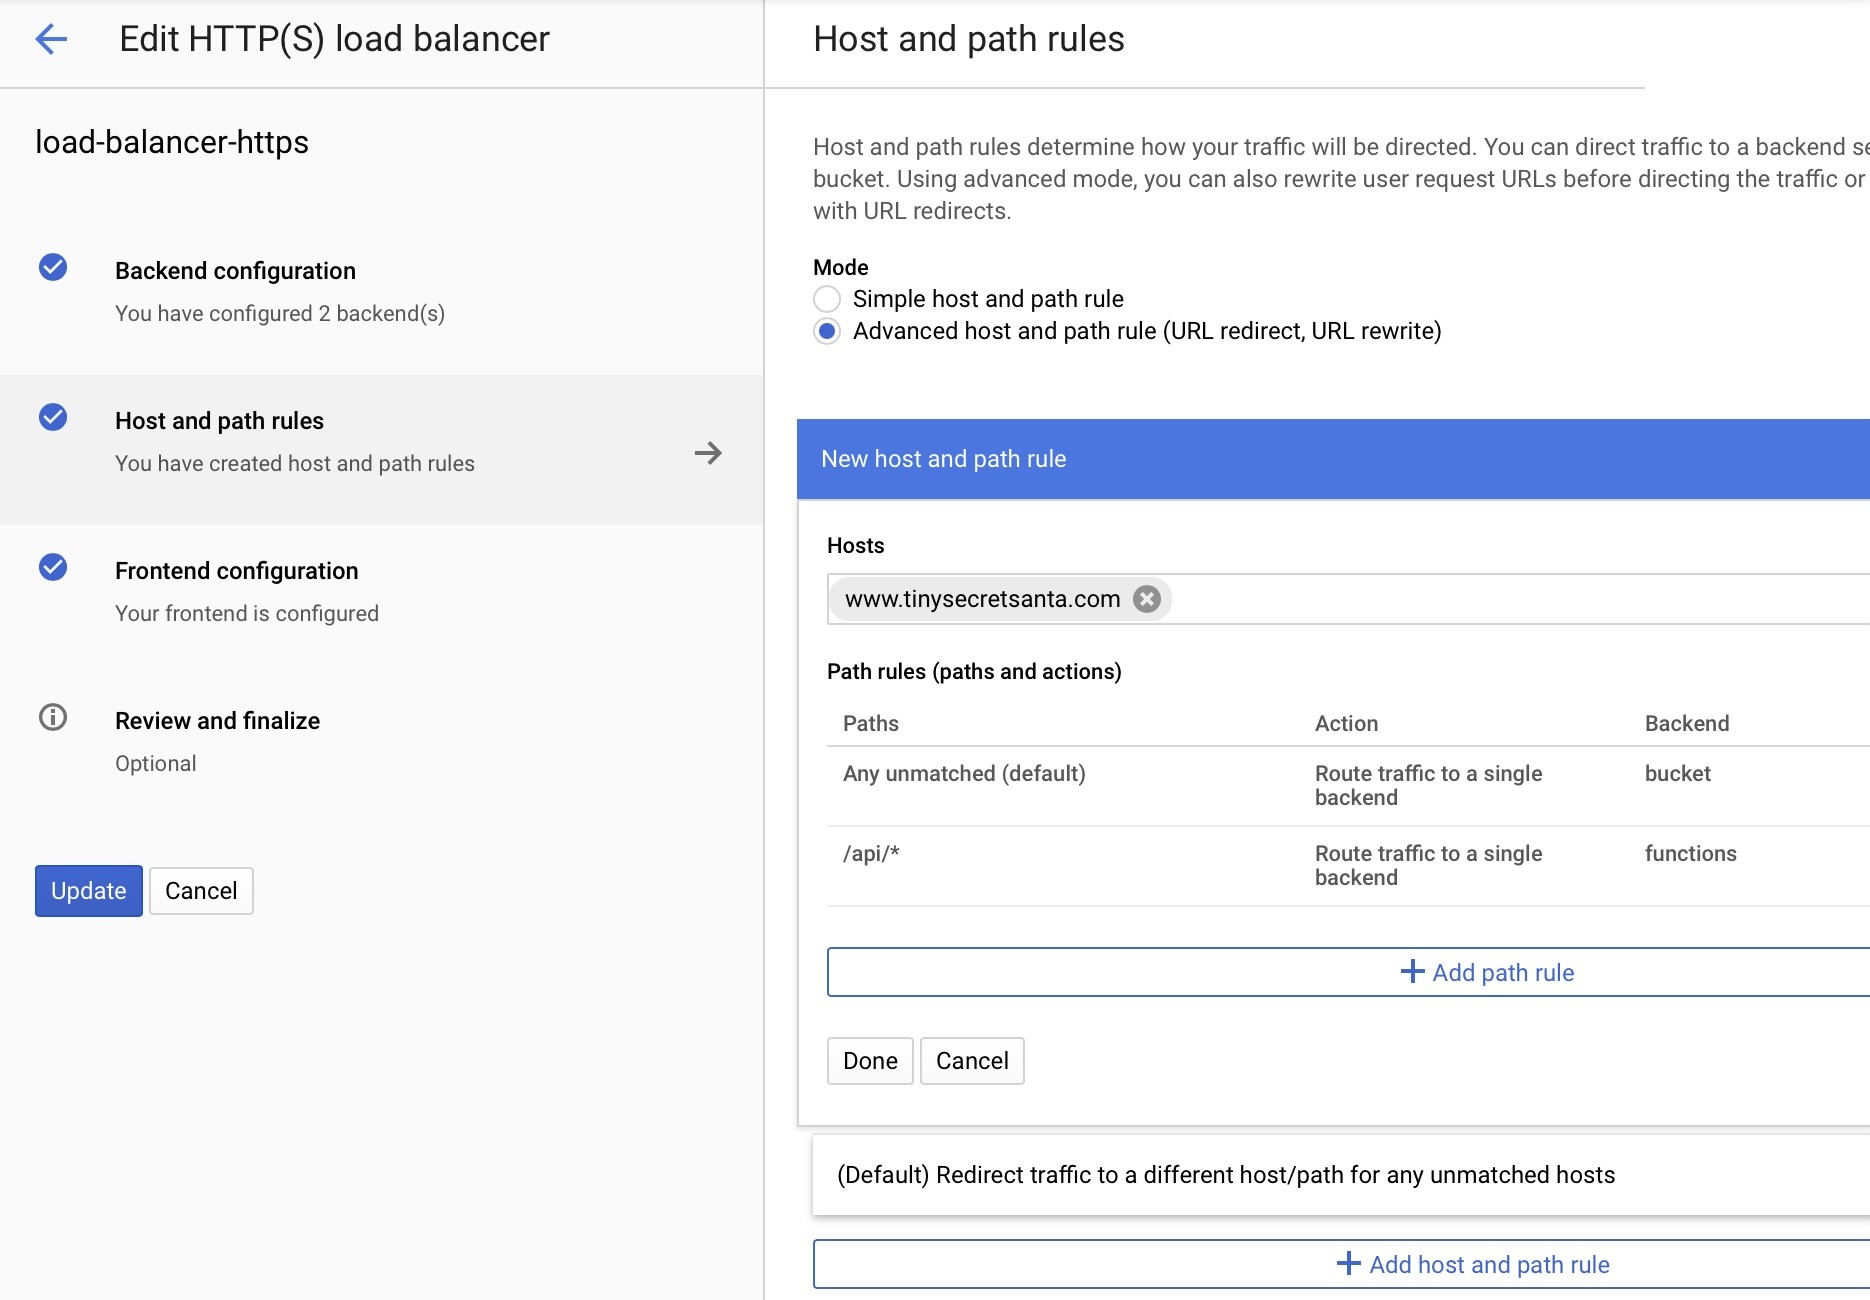
Google Cloud load-balancing creating wizard, rules section. Use the adbanved host and path rule. Configure the default host rule (at the bottom, not open, on the image) to redirect to your main host. Add a new rule for your main host that will contain two path rules. The default will point to the bucket. A new one matching the path /api/* will point to the functions. 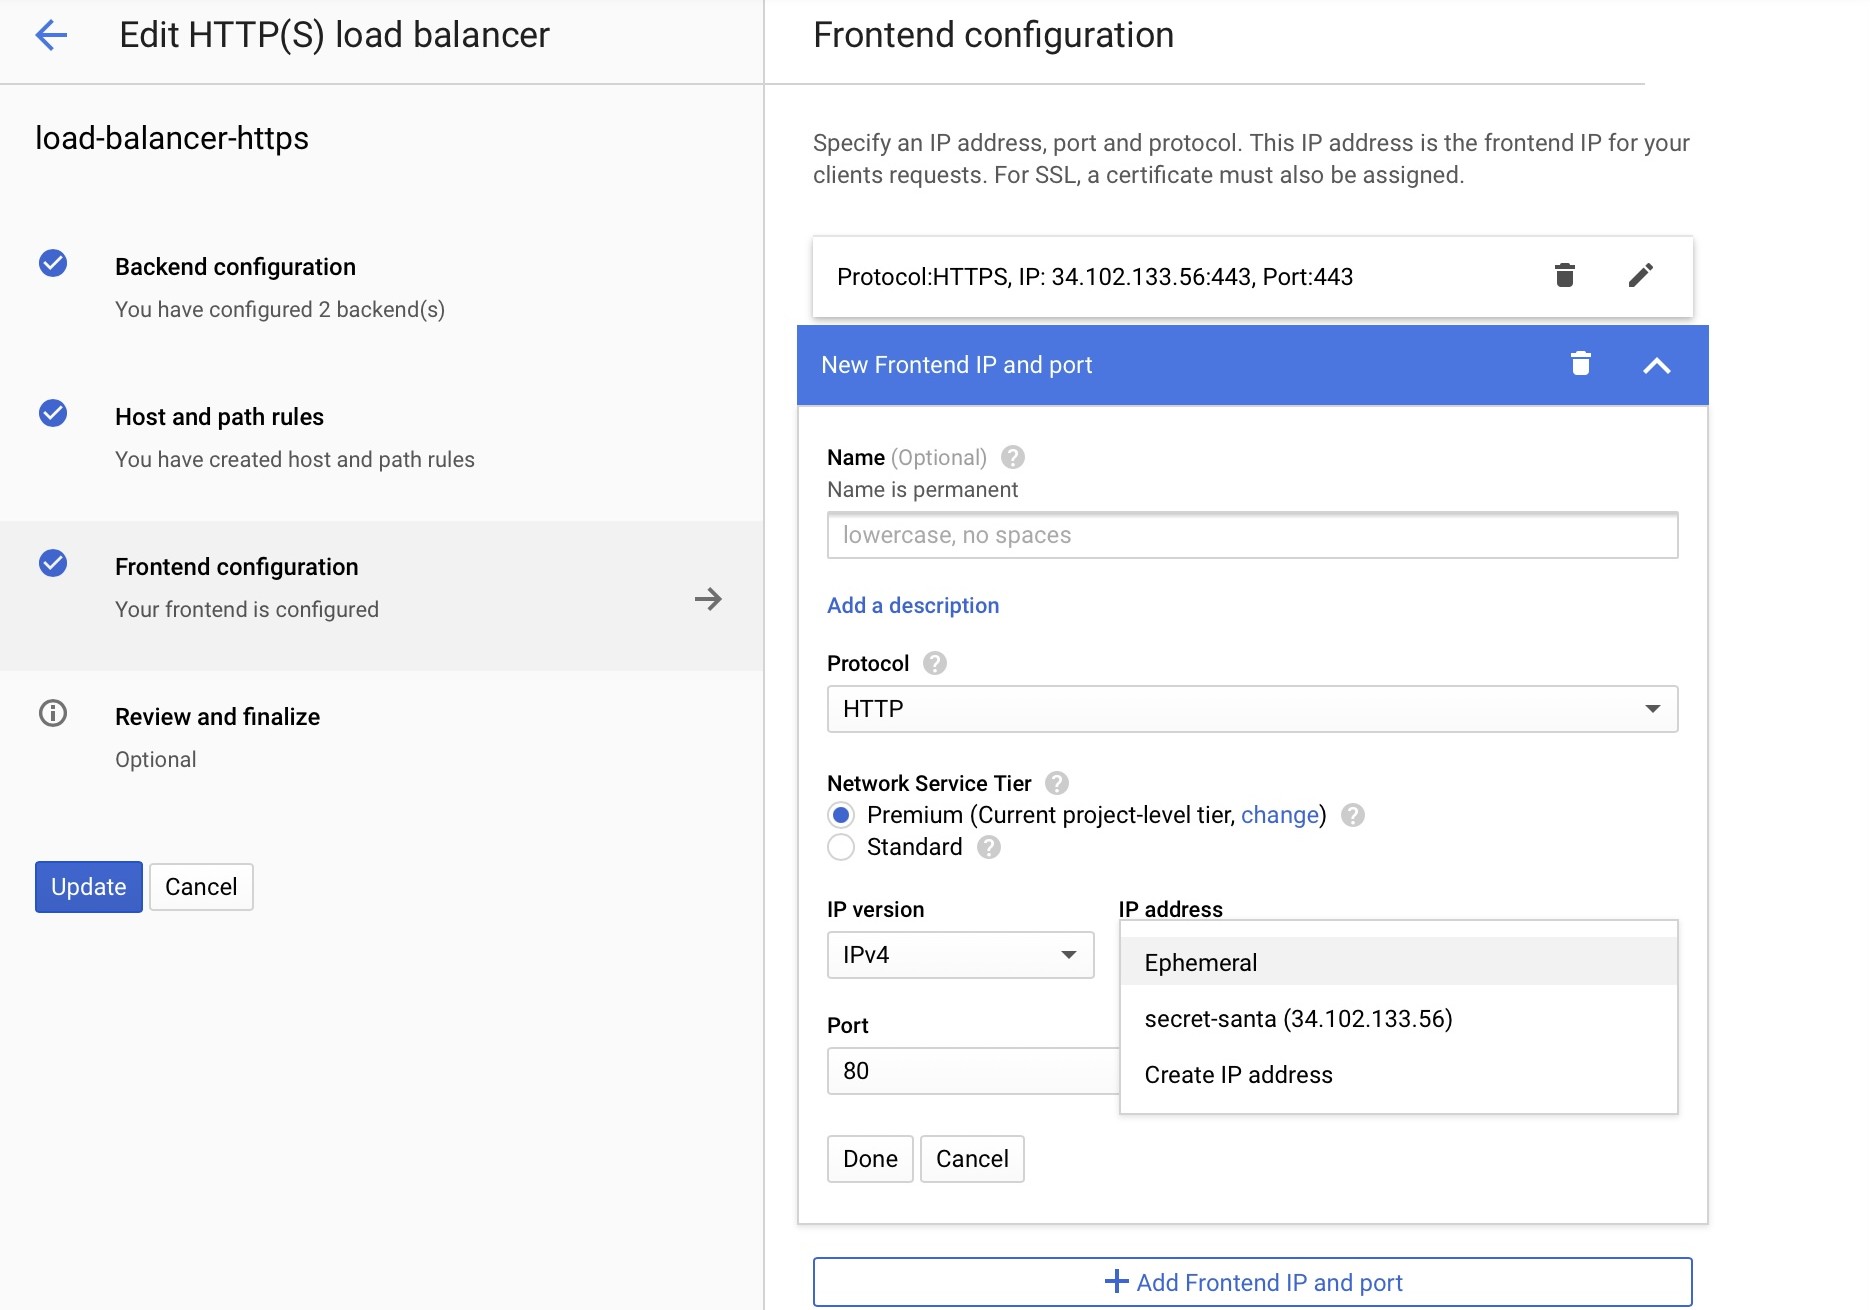
Google Cloud load-balancing creating wizard, frontend section. - Create the HTTP load-balancer
Once again, the wizard is enough - take a look at how I did it.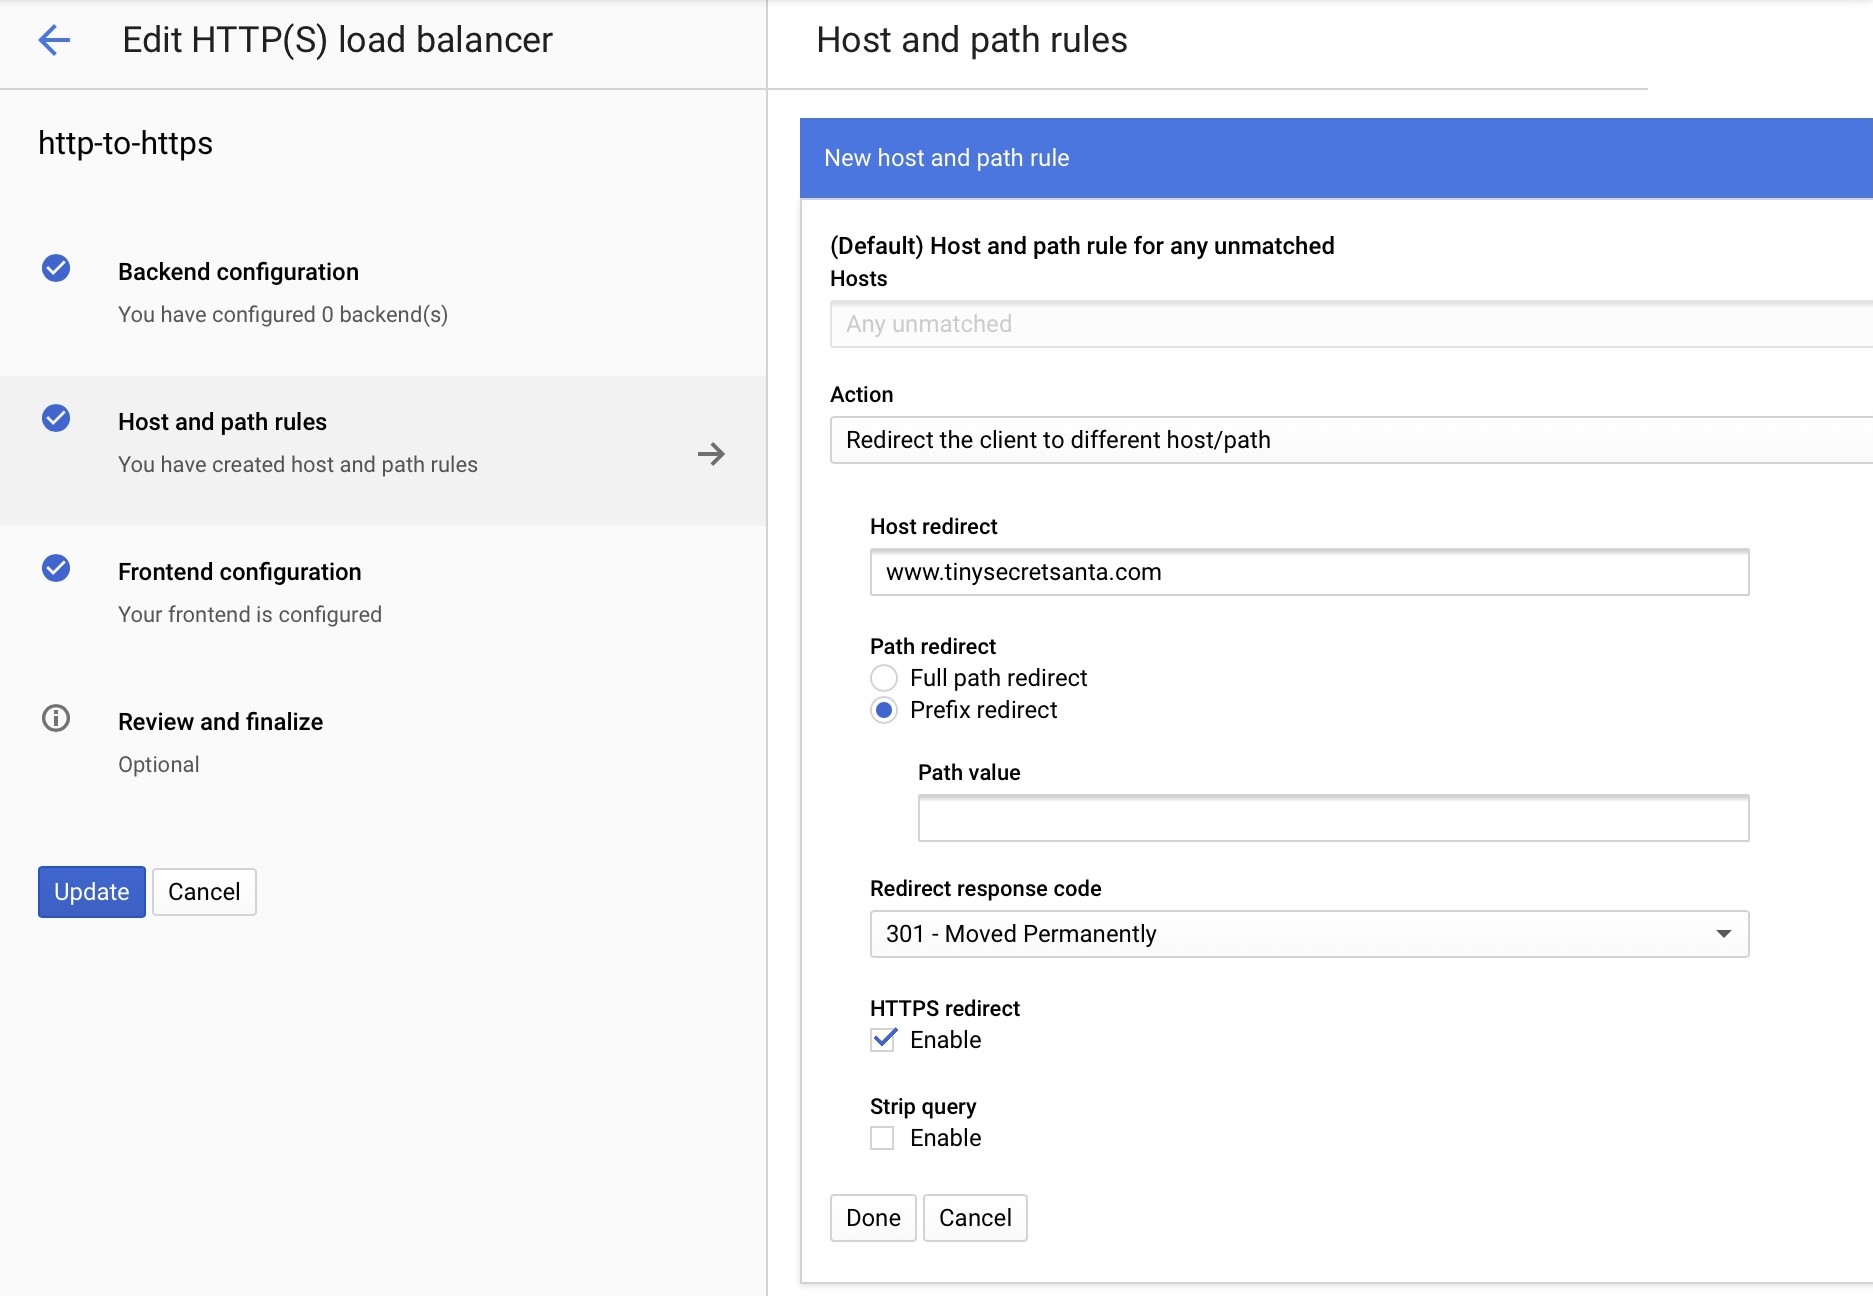
Google Cloud load-balancing creating wizard, rules section. 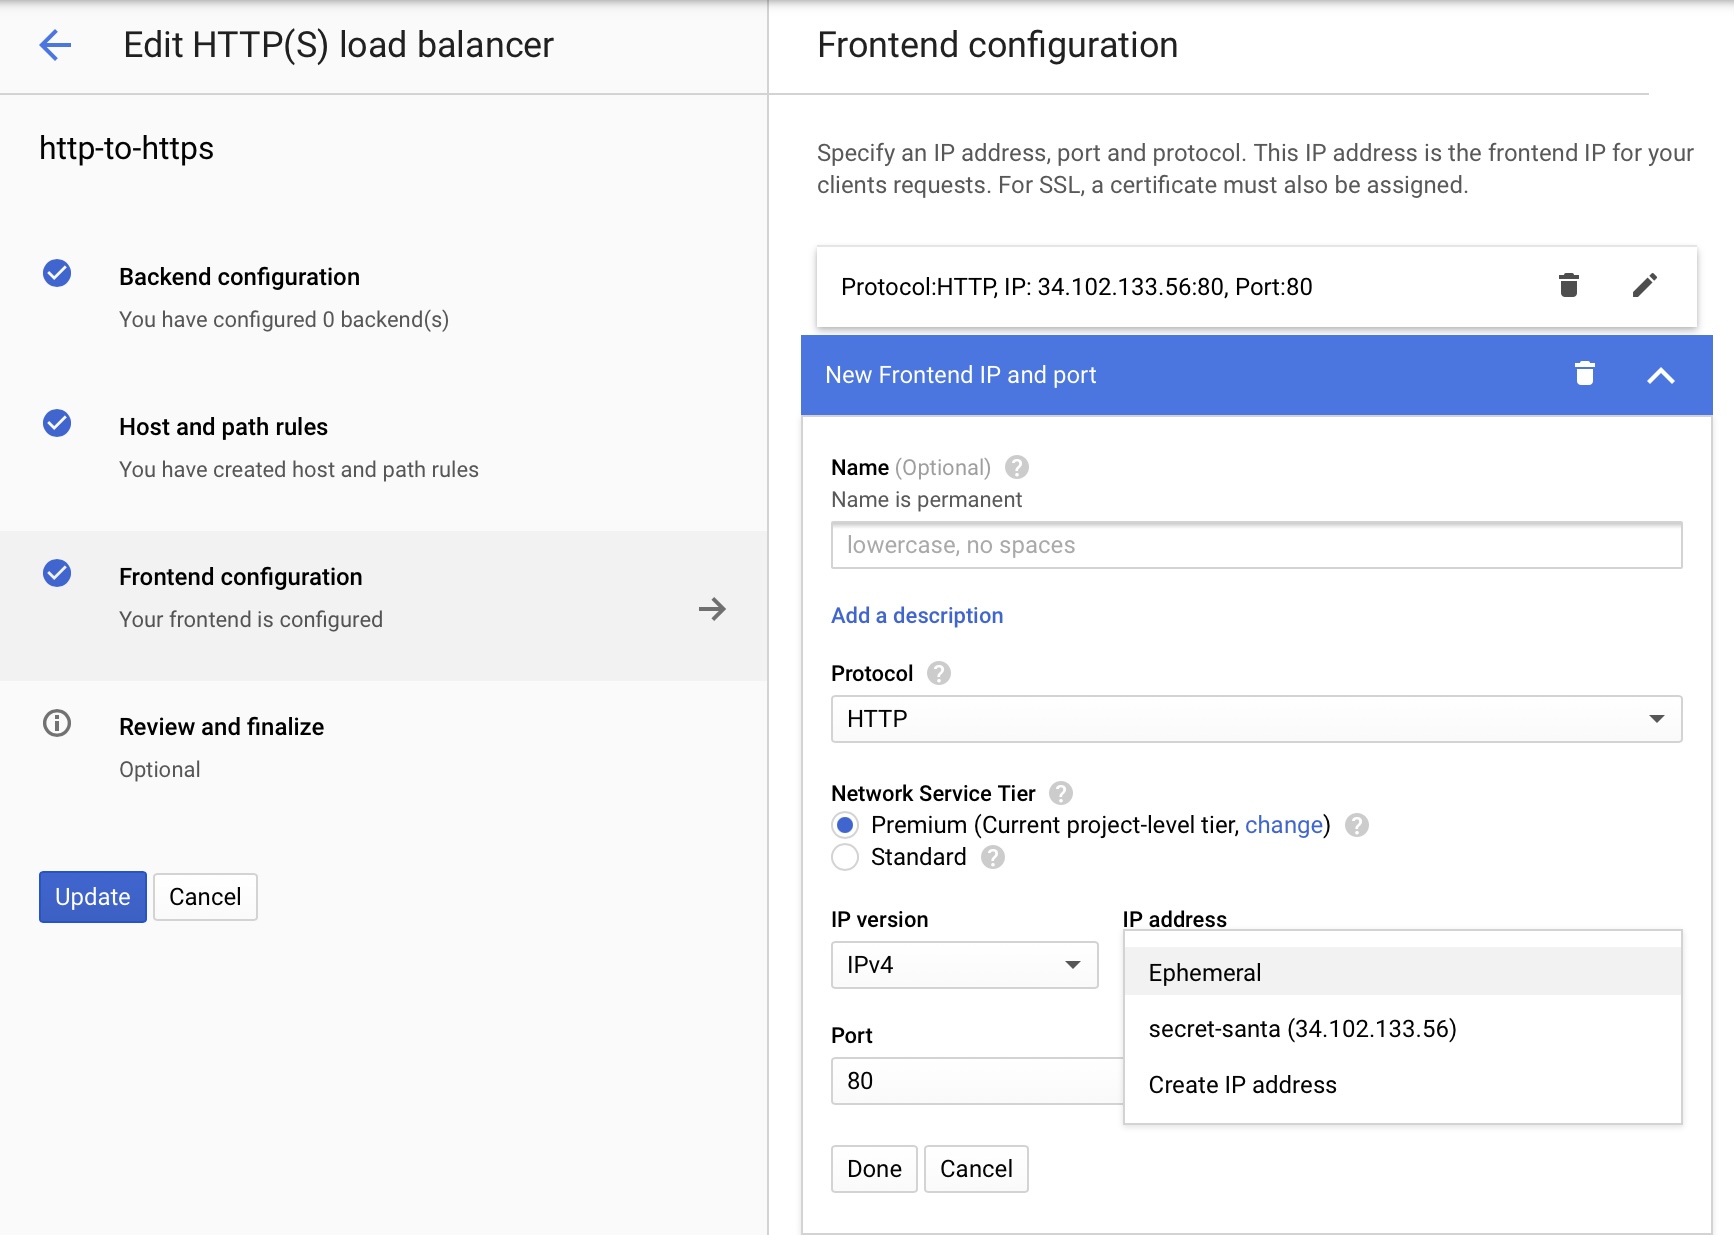
Google Cloud load-balancing creating wizard, frontend section. - Configure the DNS
Finally, we just have to set up the IP address we reserved in step 4 as A records for all domains that we care about. In my case, the top domain and thewww.subdomain.
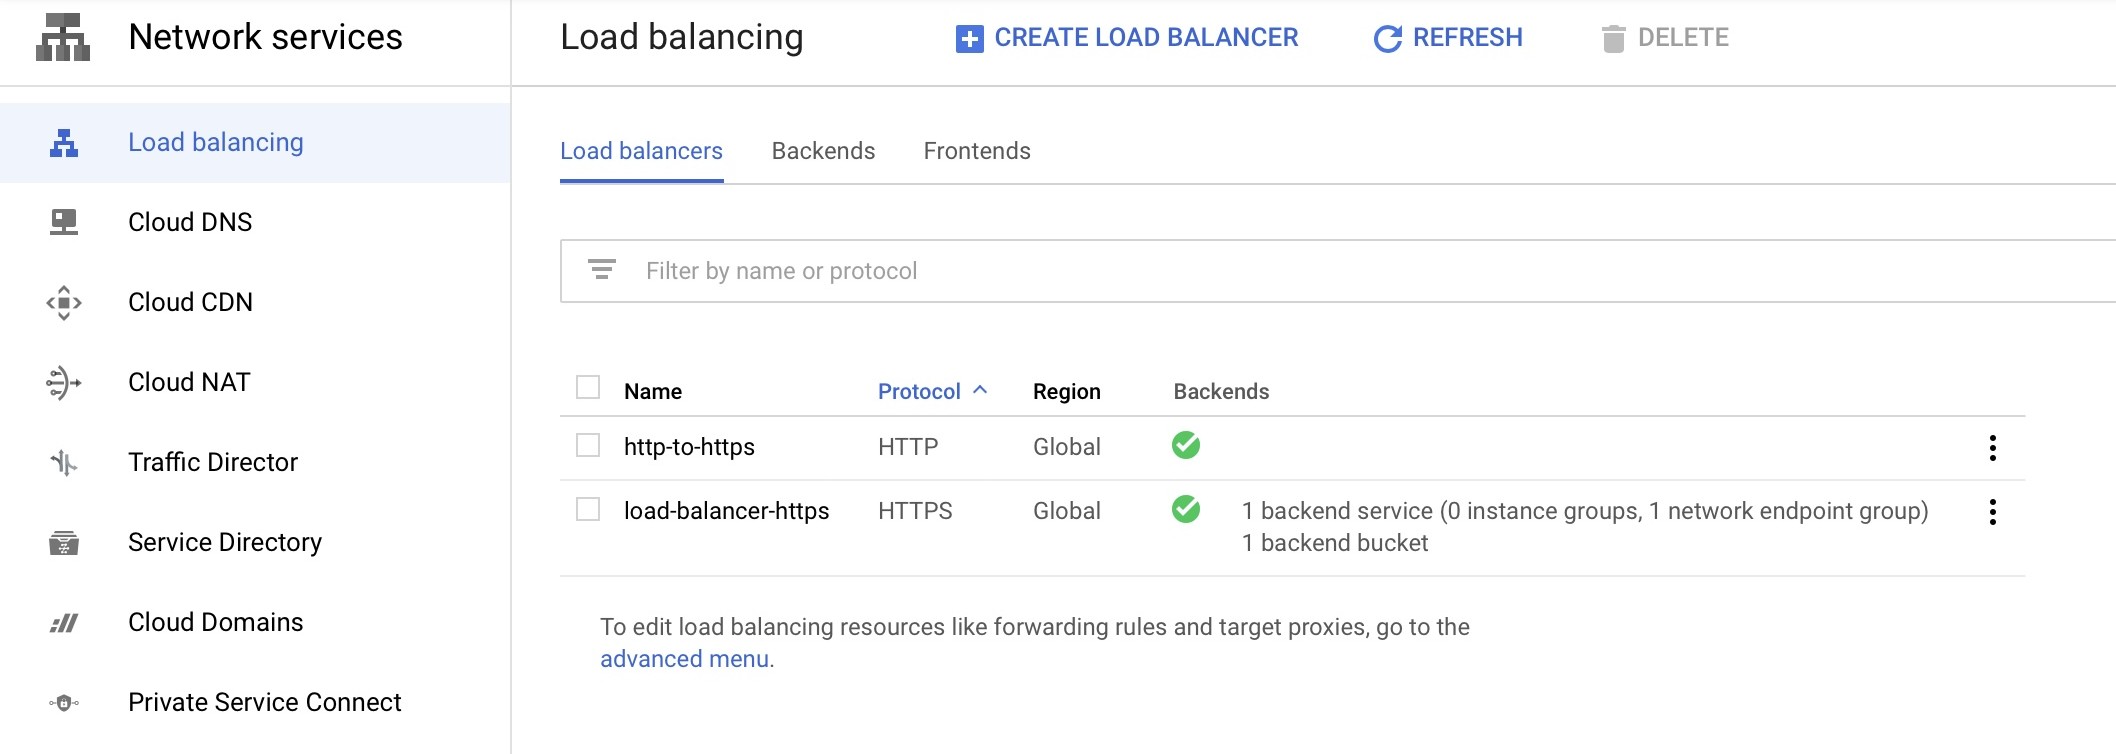
After all the steps, you should have the 2 load balancers configured.
My issues with GCP
The deployment described works for the end-user. However, I found some annoyances that I was unable to resolve.
First of all, the cost. In my case, the load balancer was costing more than the rest of the application, around 18GBP per month. It is not huge, but it did not feel right that the load balancing costed more than everything else. I have to say though, that this is mainly due to the low traffic of the website.
Secondly, I could not define the cache time of the static files. I found that I could add custom response headers, however, I could not find how to set them for specific directories. For example, I would like to configure a longer cache time for the images than the main HTML.
Finally, I deployed everything using the Google console UI instead of using infrastructure as code. To do this, I would have to introduce yet another tool (like Terraform).
Conclusions
While it is possible to deploy a static website with a backend using just the GCP Load Balancer, the setup is a bit more complicated than it needs to be (7 steps). It still lacks some important points: cost, cache control, and infrastructure as code. Follow to the next blog post to learn about Firebase Hosting and why it is better for this use case.